
Scanning your old photo prints is an excellent way to preserve them, and doing so creates a hardcopy in the form of a digital image file. Once it is on your computer (just like the photos you capture onto your pc from your digital camera) it can be printed anywhere, anytime. Sounds simple, doesn't it? Maybe it is for those of us who are familiar with the process of scanning photos, but for some, it might as well be rocket science. Well, today, with the help of Photoshop and an Epson Photo flatbed scanner , we are going to learn photo scanning basics.
Before You Scan
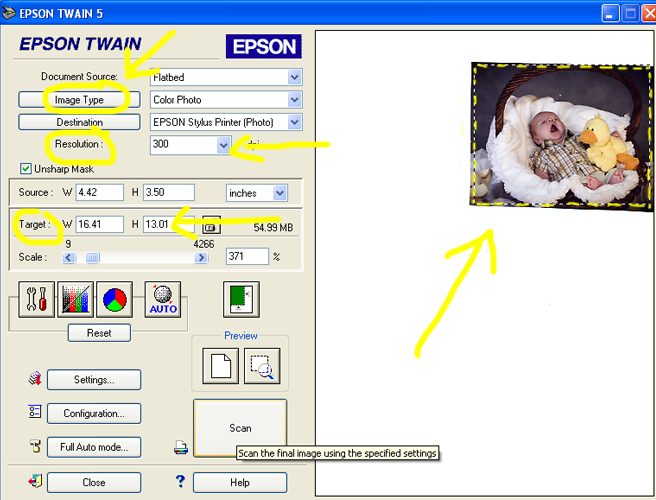
Assuming you own a flat-bed scanner your first priority is to adjust your scanner's output settings. To do this, open the image/photo editing application or manager that came with your scanner. Under the "File" menu, you may see anything from the term "import" to "acquire" which when selected, should lead you directly to your scanner, as in Figure A.
-
Select Area to Scan. If your photo covers the entire scanner bed, you will not have to worry about this step, but if your photograph is smaller than the scanner, you'll want to read this. This step is perhaps the most neglected because it's usually not necessary when scanning documents and therefore not commonly understood. Once your scanner's menu pops up, it will likely perform a "pre-scan" in order to give you a preview display of your photo on the scanner bed. If your scanner does not do this on its own, just locate the "preview" or "prescan" button to start the process manually. Once the preview has finished rendering, you will need to select the area (within the display window) that you would like to be included in the scan. Using your mouse, select a corner of the photo and drag an outline around your photo (as shown in Figure B). The outline of the desired area to be scanned will normally be indicated by dotted lines. Avoid selecting anything but the image itself to ensure a good scan. If you notice your width and height dimensions have suddenly changed, you're doing it correctly. Remember, when this step is skipped, the next 2 steps can not be properly completed.
-
Set Scan Resolution. Resolution is measured in the amount of pixels or dots per inch. Pixels per inch, or ppi, is how an image's resolution is measured, while dots per inch, or dpi, refers to print resolution. The higher the number, the crisper the results.When setting resolution for a photo or image scan, a good number to stick with is 300. Your scanner may already be set to this, but always make sure.See Figure B.
-
Set Target Size. This is where you tell your scanner which dimensions you wish the resulting width and height to be. This section is often referred to as "Output" or "Target Size". See Figure B. Even if you are scanning a photo print as small as a 4"x5", you can tell the scanner to produce a scan as large as 16"x20". As long as you have your resolution set at 300, your results will be quite remarkable.
-
Set File Format. Your scanner will need to know what format to use when it saves the new digital image file. Find the button that says "format", or "image type" to specify the file format (see Figure B). The most commonly used file formats for digital image files are .jpg, .jpeg, .gif, .tif, and .tiffs. And of all of the afore mentioned formats, the JPEG format is preferred by most. JPEG offers minimal compression and excellent print results.
Once you have your settings in order, go-ahead and hit the "Scan" button. Once the scan is complete, simply close the scanner dialogue and focus on your newly scanned image. If you are a Photoshop user, your newly scanned image should open itself by default. Otherwise, simply retrieve it from its "save destination" and start the inspection process.
Scan Your Photo: Getting Good Print Results from Scanned Photos
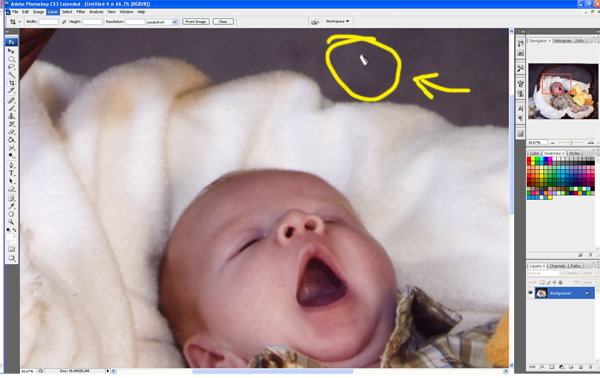
People sometimes forget that photo prints are susceptible to dust and scratches even when the photo has been protected in a frame. Your photo has been scanned by your scanner, but now it's time for it to be scanned by you. Inspect your image for anything that looks like it doesn't belong. Don't be surprised if you find yourself cleaning the scanner and starting from scratch - finger prints on the scanner's bed can be enough to sabotage an otherwise perfect scan-job. In addition to foreign objects, be on the look out for small "chips" on the print's surface (see Figure C), and anything else that may be painfully obvious when magnified.
These imperfections will likely be twice as obvious should you have new prints made, and ten times more obvious if you are increasing the original print size by 3 or more. If you are not proficient in touching up photographs, have the print shop handle it for you. Most places specializing in large photo or canvas prints offer minor touchup services for a small fee, and the investment is well worth it.